Using SQL Server for SuperPro Designer's Databases
SuperPro Designer gives you now (starting with release v14 b02) the option to use Microsoft SQL Server as the service of choice for its databases instead of its default (MS-Access).
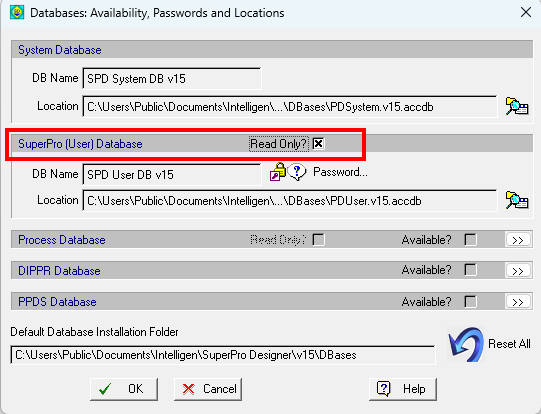
IMPORTANT NOTE: As of now, using SQL Server to service any of SuperPro Designer's datasources only works in servicing SQL requests for READING data from the program; attempting to carry out a task that requires WRITING in the datasource WILL NOT WORK. Since SuperPro Designer uses the DIPPR database as an alternative source for physical properties of pure components and the PPDS database for binary coefficients of non-ideal mixtures just to read the information but NEVER STORE a new component or new set of binaries in that format, they are best suited to be deployed on a SQL Server. SuperPro Designer's main database (User DB) is NOT SUITED to be deployed on SQL Server since it is used to deposit information on new resources created by a user (e.g. new pure components and their properties, new heat transfer agent or power type or labor type or consumable). The only way that such a deployment may work is only if the SuperPro Designer user has voluntarily checked the box of "Read Only" for its main database (see below):
The only way this setup makes sense is withing a large organization that has a dedicated user(s) of SuperPro Designer that have the authority to create and/or modify data in their corporate SuperPro Designer database (in .accdb format) and the later update upload the database on the corporate SQL Server for the rest of the users to engage for simply READING properties of resources used in SuperPro Designer modeling tasks (such as components, mixtures, heat transfer agents, etc.).
Below you will find the steps and instructions on how to:
-
Set up SQL Server on your computer,
-
Import SuperPro's Microsoft Access databases (in .accdb format) into the SQL Server and
-
Re-register the required ODBC data sources to be connected to your SQL database.
If you already have SQL service running you can skip (A).
A. SQL Server Installation and Setup
If you already have SQL service running and available you can skip this setup.
To install SQL Server:
-
Open the Microsoft website to download the SQL Server. You can either choose between the Azure / at the edge / on-premises versions for which you must pay or go with the Developer or Express versions which are free. In these instructions guide we use the Express version. https://www.microsoft.com/en-us/sql-server/sql-server-downloads
-
Click Download Now and the procedure will start immediately.
-
After the SQL Server has been installed a new screen will appear and it will give you the option to also download and install the SQL Server Management Studio (SSMS). Alternatively, you can go to this link to download and install the SSMS. https://aka.ms/ssmsfullsetup
B. Import SuperPro's MS-Access Databases to SQL Server
Below you will find the step by step procedure on how to import SuperPro’s MS Access databases to SQL Server.
To import an MS Access databases into SQL Server it is recommended to use the SQL Server Management Studio’s (SSMS) Import and Export data wizard. When you first run the SSMS program you will be presented with the following screen:
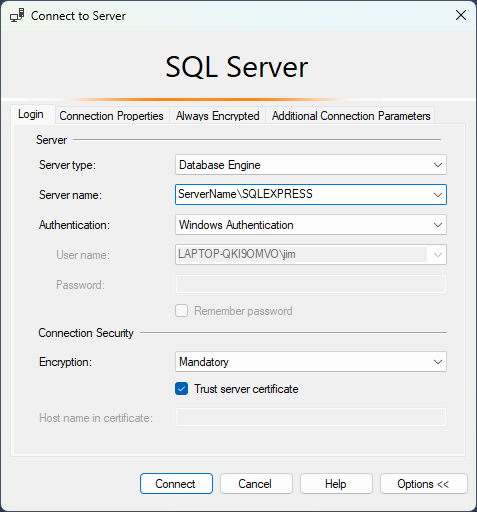
From this dialog, you must make sure the Server name corresponds to the computer running the SQL Server service. For simplicity connection to the server is authenticated using Windows Authentication; alternatively, authentication can also be performed by the SQL server itself. Lastly make sure the Trust server certificate is checked and click on Connect.
Then proceed as follows:
-
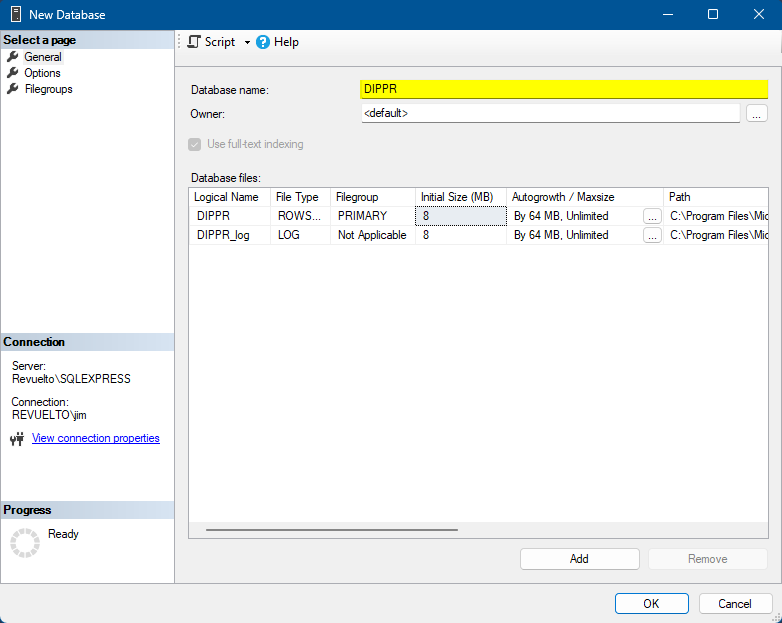
Before initiating the Import wizard you must first create a database in SSMS and give it a name. Right click on the Databases tree node and select New Database. On the screen that appears type in a name to your new database and click OK. In this case we are importing the DIPPR database so we will use the name "DIPPR":
-
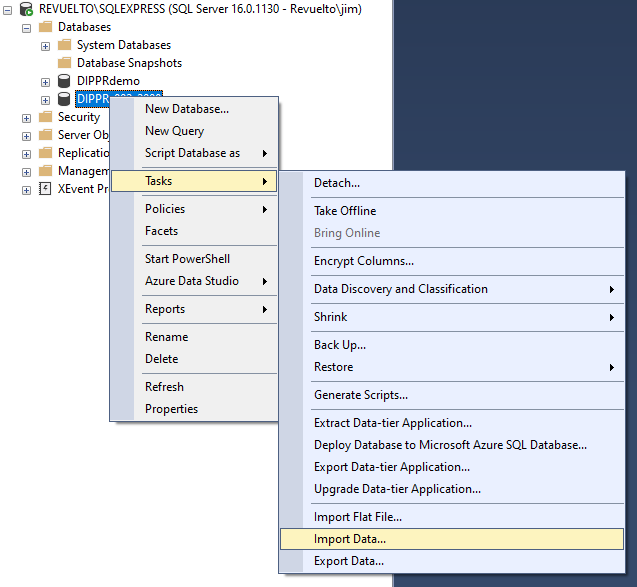
Right-click on the newly created database and select Tasks > Import Data
The SQL Import and Export wizard starts with the following screen. Click " Next> " to begin the import process.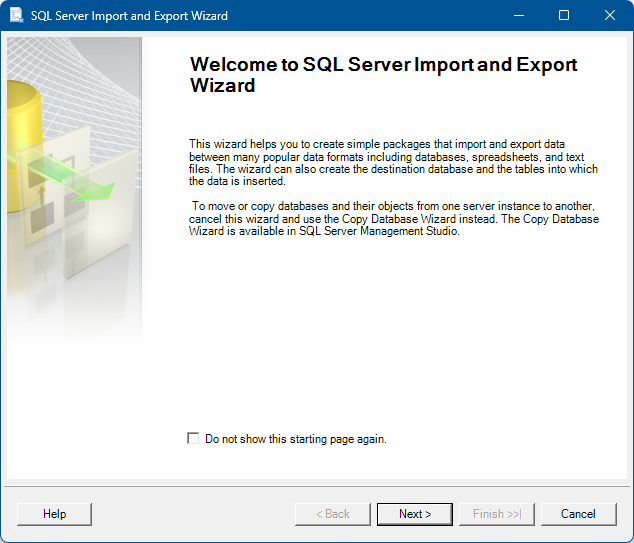
-
In this step you must select the from the "Data source" drop-down the type (format) of the data that we are importing. Since SuperPro Designer's data come in .accdb Microsoft Access files, we choose "Microsoft Access Database Engine". Then click on Browse... to select the ".mdb" or ".accdb" file you want to import in the SQL server:
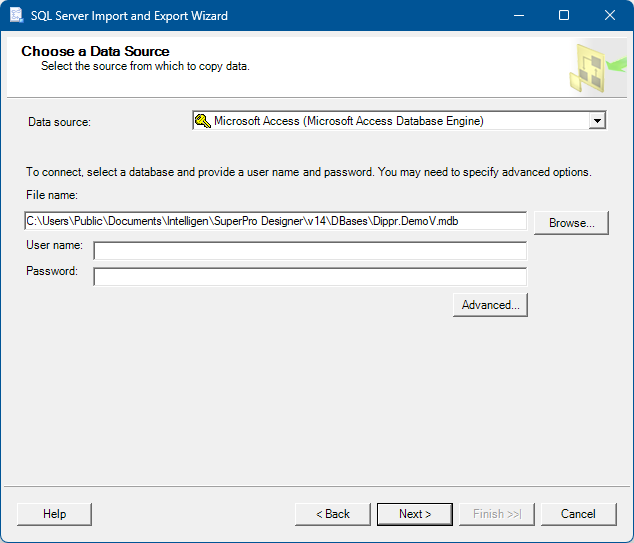
In the screen above, we have chosen the DIPPR sample file that comes (free-of-charge) with the installation of SuperPro Designer. Obviously, if you have the full blown set of DIPPR data, you should choose that file.
Since all SuperPro Designer's database files are password-protected, click on the Advanced... button and go to the All tab (see below):
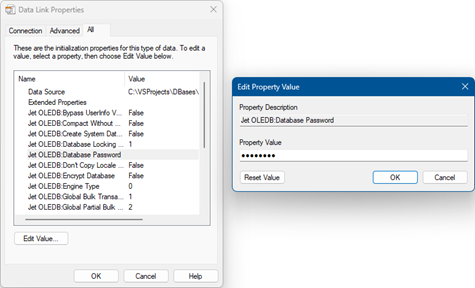
Select the Jet OLEDB Database Password entry and click on Edit Value to set the password in the Property Value edit box (see above). After setting the password, click " Next> " to proceed to the next step. -
In the next screen choose the Destination of the data. Since we are importing our database data to SQL server we select Microsoft OLE DB Driver for SQL Server from the "Destination" drop-down (see below):
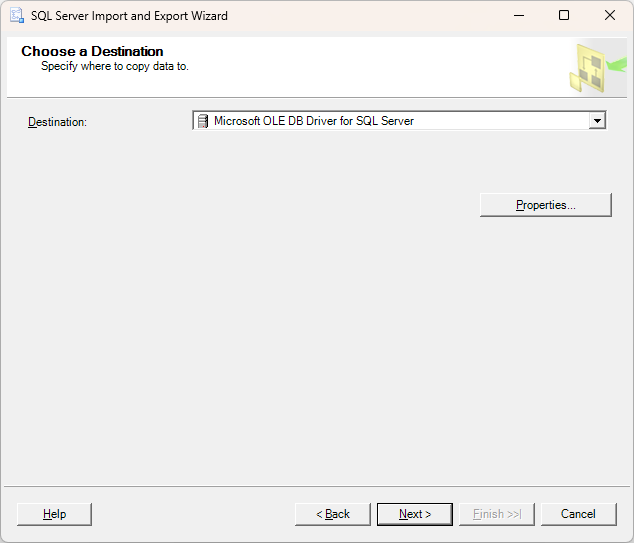
Before proceeding click on Properties... to produce the dialog below:
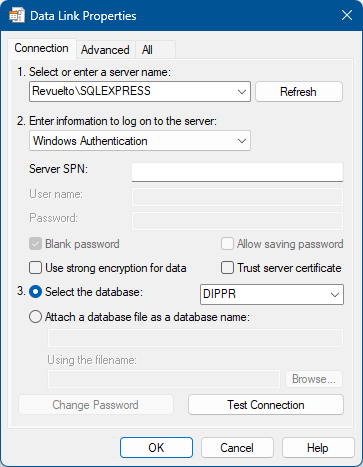
From the dialog shown above, you will make the following specifications:
a. Enter a Server Name. If the server is not available in the list of choices, you may have to type it out yourself.
b. Select information on how to log on to the server; Choose "Windows Authentication" and
c. Select one of the available databases (in our case "DIPPR").
Finally, exit the dialog by clicking on OK. That will return you to the previous dialog. Click "Next>" to advance to the next step below. -
On this screen specify the way the data are transferred; we choose to Copy data from one or more tables or views
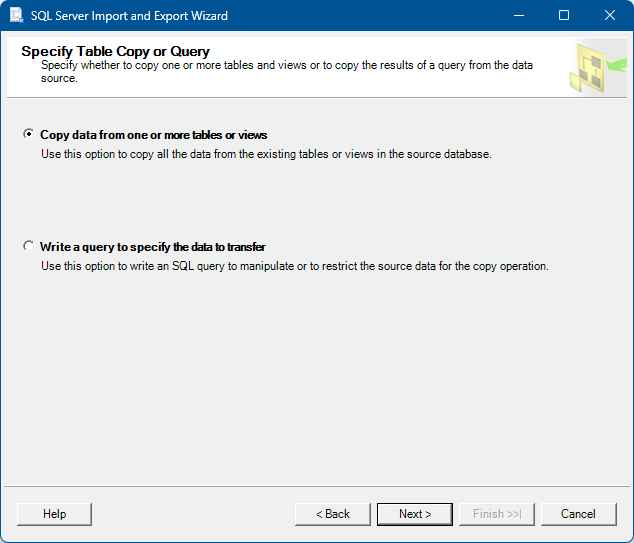
Then click on " Next> " to advance. -
The next screen shows a list of all the source tables from the mdb/accdb files that can be copied to SQL server:
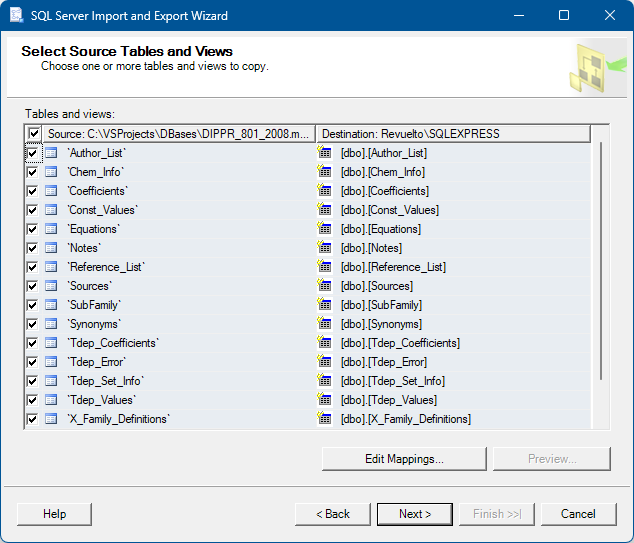
Since we want to import into SQL the ENTIRE contents of the database, we choose all the tables by checking the check box at the top row (all the way to the left - see above - ). Then click on " Next> ". -
After clicking on Next> the following dialog shows up:
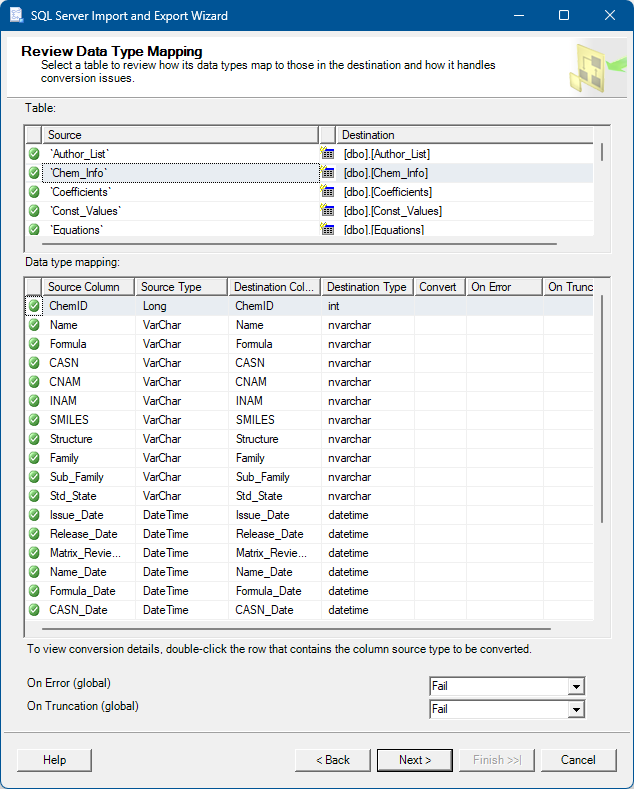
This dialog table allows the user to review all the data types of each table, and see how they will be mapped to the destination database. Simply approve the choices already made and click on " Next> " . -
The following dialog will appear:
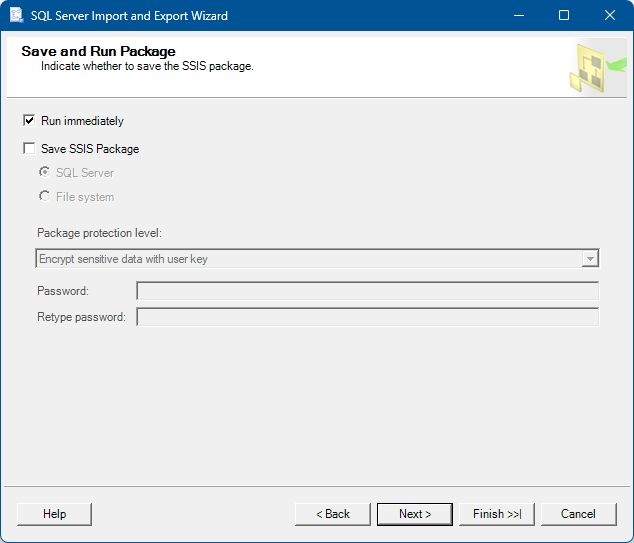
From this dialog, it is recommended to choose "Run immediately" without saving the SQL server integration service package (SSIS) - so leave that box unchecked (see above). Then click " Next> ". -
The following screen will appear:
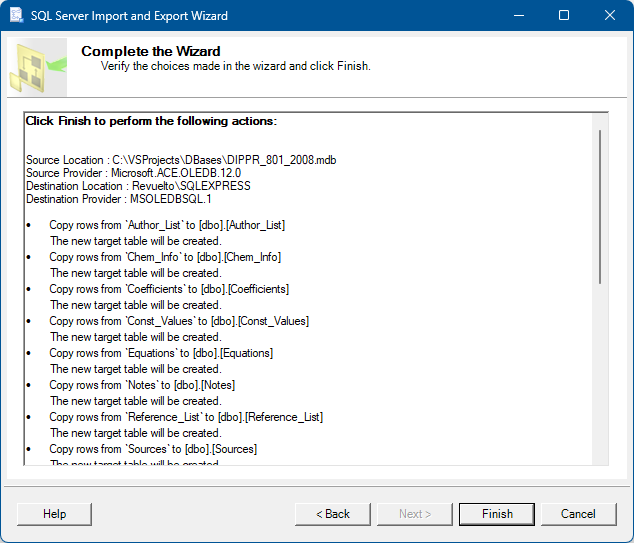
This screen allows the user to see and verify what actions will be performed. Essentially, it's a long list of tasks that will be executed by the SQL to reproduce the tables and records from the ".accdb" database file into the SQL database.
Click Finish to start copying the data to the SQL Server database.
The next screen will show the progress on each of the requested tasks of importing the data into SQL...

Notice that when the importing is finished, for each action (line in the shown table) it will indicate whether it succeeded or not. If everything was imported as expected, you should see "Success" on each line. When the process has finished, the "Close" button will be activated. -
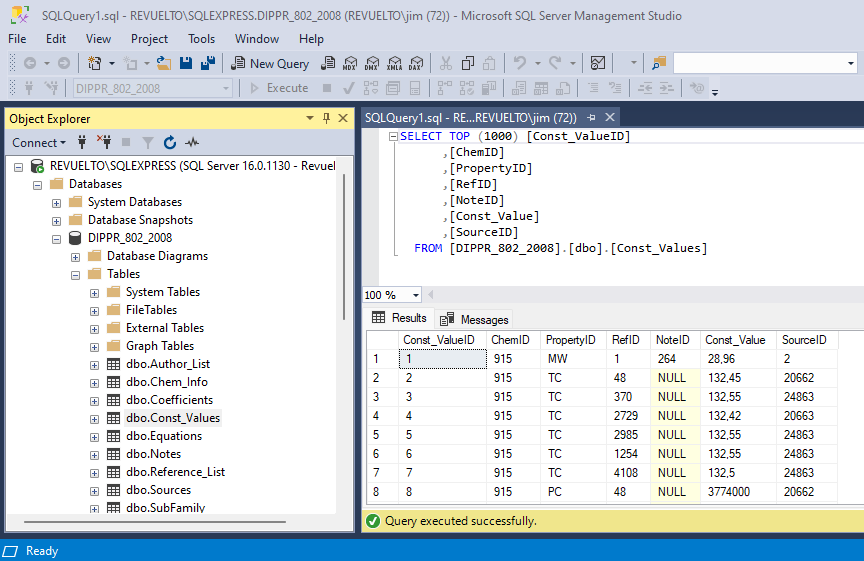
Once the importing process is completed you may view if the tables have been created properly and all their data has been copied by right clicking on a table in the Tables node and click on “Select top 1000 rows…”
C. Re-Create ODBC Data Sources Serviced by the SQL Databases
SuperPro Designer exchanges data with its databases by communicating with 4 distinctly named ODBC Data Sources:
a. "SPD System DB v14" (for system-use only data)
b. "SPD User DB v14" (for user-defined data)
c. "SPD Process DB v14" (for information on process models created and deposited to the user's library/collection of .spf files) and
d. "SPD DIPPR" (for component property data as provided by DIPPR)
In order to make the SQL databases available to SuperPro Designer, you must delete the existing Data Source (which by default is set to be serviced by the corresponding .accdb MS-Access file) and re-create it (with the EXACT SAME NAME) but this time, instruct it to use SQL server and furthermore, the corresponding database in SQL server.
You will need to ran the 32-bit ODBC Data Source app that is available in your Windows environment do accomplish the above. If you can't find the app, simply type "32-bit ODBC" in the Search line of Windows and the app will appear for you to start it.
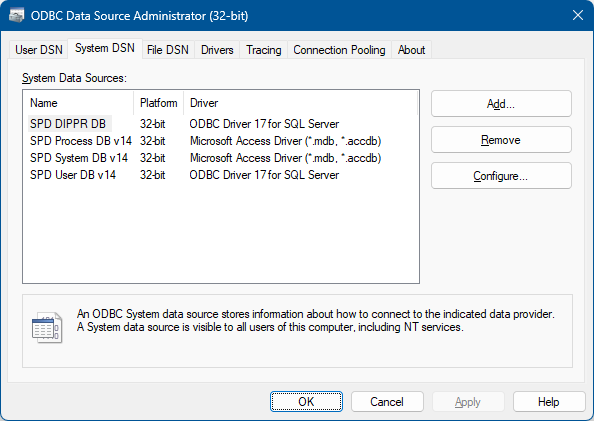
When you start the app, you should see the following (under the System DSN tab):
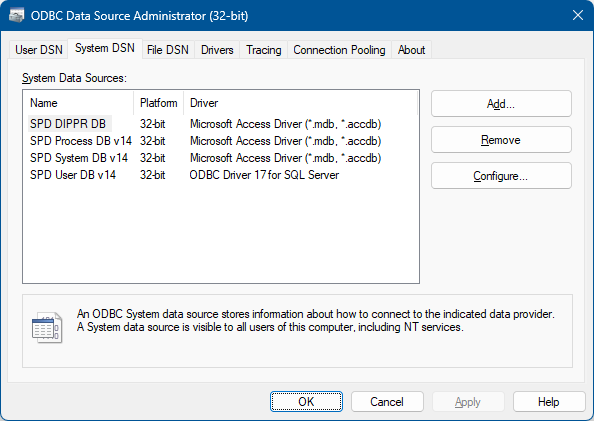
These are the entries created by SuperPro Designer's installation script. Notice, that the entries are created under the "System DSN" and that is one of the reasons that running SuperPro's installation script requires elevated Admin rights.
Even though in this documentation we will explaining how to replace the "DIPPR" data source that is serviced by MS-Access to a new one that is serviced by SQL, the same applies for the rest of the Data Sources used by SuperPro.
1> If you have Administrative Privileges AND you wish ALL USERS of SUPERPRO DESIGNER switch to SQL database of DIPPR then you will be working with the "System DSN" tab of the 32-bit ODBC Data Source app (follow steps 1a through 1f below). If you do NOT have Administartive Privileges skip to section after 1f.
1a. Locate the entry named "SPD DIPPR DB" in the table, select it and click on Remove. This will delete this data source from the table.
1b. Click on Add... to re-introduce the ODBC data source once more; the following screen will appear that prompts you to select the type of services tied to the new ODBC data source:
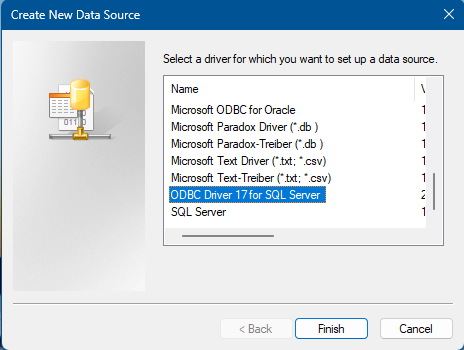
Select ODBC Driver 17 for SQL Server and click Finish.
1c. On the next screen, you will need to provide a name for the ODBC Data source, a description (optional) and a SQL Server to service that data source:
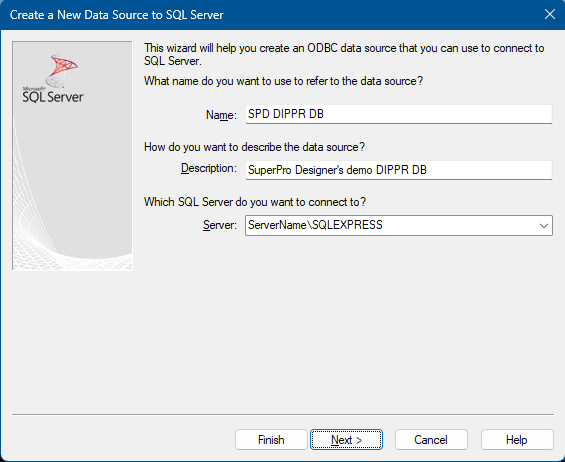
It is absolutely essential to type as the data source the same as it was before you delete it (in this case "SPD DIPPR DB"). You can type anything you wish for "Description". Finally, in the drop down, select the SQL service that will give you access to the data for this database (if you don't see the name of the service, you may have to type it yourself). In the case shown above it is "ServerName\SQLEXPRESS". Then click " Next> ".
1d. Once you click on Next> the following dialog appears:
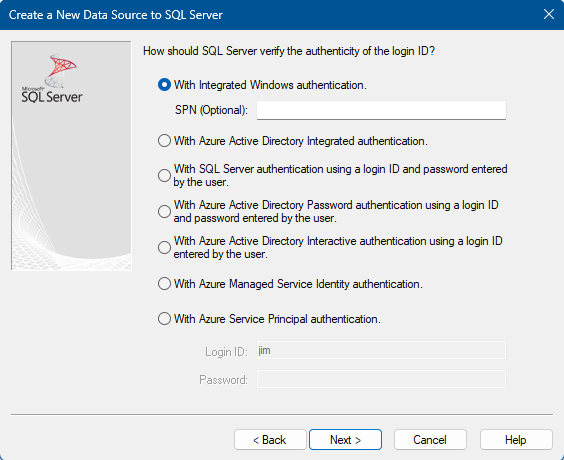
Select the login ID authentication to be done With Integrated Windows Authentication. Then click on " Next> ".
1e. The following screen will appear:
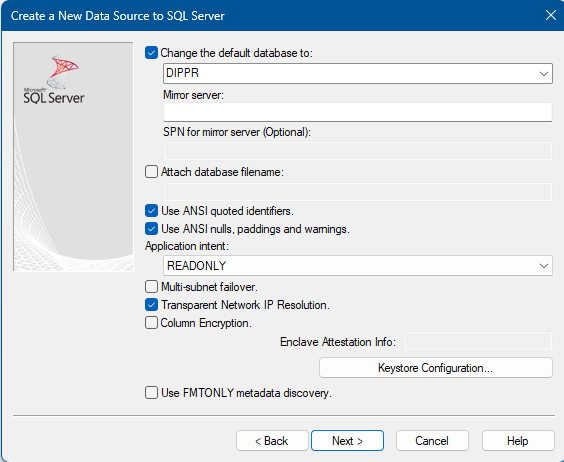
On this screen select the SQL Server database name. This is the new database created in SSMS where all data from the mdb/accdb files were copied to (in our case "DIPPR"). Also on this screen choose the application intention, meaning whether the database is ReadOnly or ReadWrite. For the DIPPR database it should be ReadOnly. For the rest of SuperPro Databases, it should be ReadWrite. Then click on " Next> " .
1f. The next dialog that appears is:
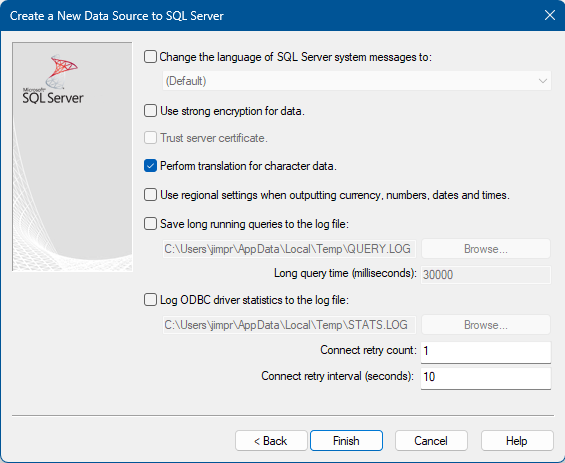
Leave all the default selections and simply click on "Finish".
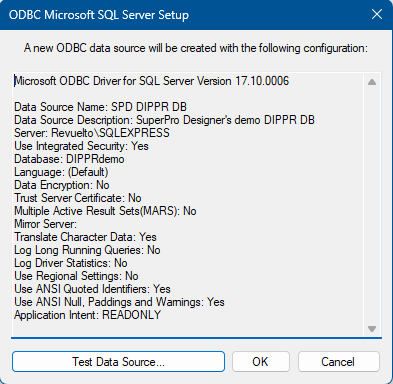
Then the final screen shown below will appear that shows a summary of all specifications of the new data source configuration that has just been created:
When all steps above (1a - 1f) have been completed, a new entry now will appear in the System DSN table as shown below:
The database is now ready to be used by SuperPro Designer. Start the application as usual and make sure that the "Is Available" option is checked for the DIPPR or for whichever other database the new ODBC entry was made (System, User or Process).
2> If you do NOT have Administrative Privileges then you will be working with the "User DSN" tab of the 32-bit ODBC Data Source app. Note that the table will be initially empty so you do not have to delete any pre-existing entries so you can skip 1a above. The rest of the steps are identical (see above 1b through 1f). Please note that the newly established ODBC data source will ONLY be available for the user that is currently logged in (and not any other users of this PC).